Download Windows 10 lock screen images From Spotlight
Windows Spotlight is a new feature in Windows 10 that allows users to download and use the featured photos of the day from Bing Images to be used as a lock screen, besides, you can vote and comment on photos.
In the upper right-hand corner of the screen, you can show your love by selecting your finger up (show favorites) or finger down with the image currently displayed. If you don’t like it, the picture will disappear. If you like, a similar image will be displayed next time.
This feature is quite nice to help you change the lock background automatically, along with the best pictures.
While using Spotlight, if you like certain images and you want to use them on other computers, you can download and save them by doing the following.
How to download images that appear on the Windows 10 lock screen
Find and save the Windows Spotlight background image using PowerShell Script
1. Download the PowerShell Find_Windows_Spotlight_images.ps1 script .
Code:
$WindowsSpotlightFolder = "$env:USERPROFILE\AppData\Local\Packages\Microsoft.Windows.ContentDeliveryManager_cw5n1h2txyewy\LocalState\Assets"
 $WindowsSpotlightImages = "$env:USERPROFILE\Desktop\SpotlightImages\"

 if (Test-Path $WindowsSpotlightImages) {
     $FolderTimestamp = Get-Date (Get-Item $WindowsSpotlightImages).LastWriteTime -Format "yyyyMMdd.HHmmss"
     Rename-Item -Path $WindowsSpotlightImages -NewName ('SpotlightImages-' + $FolderTimestamp) -Force
     Remove-Variable FolderTimestamp   # Cleanup
 }

 New-Item -Path $WindowsSpotlightImages -ItemType Directory | Out-Null

 Add-Type -AssemblyName System.Drawing
 $ImagesToCopy = @()
 $(Get-ChildItem -Path $WindowsSpotlightFolder).FullName | ForEach-Object {
     $Image = [System.Drawing.Image]::Fromfile($_)
     $Dimensions = "$($Image.Width)x$($Image.Height)"

     If ($Dimensions -eq "1920x1080") {
         $ImagesToCopy += $_
     }
     $Image.Dispose()
 }

 $ImagesToCopy | Copy-Item -Destination $WindowsSpotlightImages
 $FileNumber = 0

 Get-ChildItem -Path $WindowsSpotlightImages | Sort-Object LastWriteTime |
 foreach {
     $FileNumber += 1
     Rename-Item -Path $_.FullName -NewName ("1920x1080_" + $FileNumber.ToString("000") + '.jpg')
 }

 # Report
 $NewSpotlgihtImages = Get-ChildItem -Path $WindowsSpotlightImages
 if ($NewSpotlgihtImages) {
     Write-Host
     ($NewSpotlgihtImages).Name
     Write-Host `n($NewSpotlgihtImages).Count "new images were copied into $WindowsSpotlightImages`n" -ForegroundColor Green
 }
 else {
     Write-Host "`nNo new images were copied.`n" -ForegroundColor Red
     Remove-Item $WindowsSpotlightImages -Force
 }

 # Cleanup
 Remove-Variable WindowsSpotlightFolder, WindowsSpotlightImages, ImagesToCopy, Image, Dimensions, FileNumber, NewSpotlgihtImages
2. Save the .ps1 file to the desktop.

3. Unblock .ps1 file.
4. Right-click or click and hold the .ps1 file and click Run with PowerShell .
5. You should now have a SpotlightImages folder on your desktop with Windows Spotlight 1920 x 1080 images stored in it.
The Spotlight Images folder on the desktop with Windows Spotlight 1920 x 1080 images is stored
Manually find and save Windows Spotlight wallpapers
1. Copy and paste the folder location below into the File Explorer address bar and click Enter to open the Assets folder .
Note : The directory location below is revealed in the Landscape Asset Path string value under the registry key below.
HKEY_CURRENT_USER\SOFTWARE\Microsoft\Windows\CurrentVersion\Lock Screen\Creative

%LocalAppData%\Packages\Microsoft.Windows.ContentDeliveryManager_cw5n1h2txyewy\LocalState\Assets
2. Select all items in the Assets folder and copy them all to another folder (eg % UserProfile% \ Pictures ) of your choice.
If you prefer, you can also right-click on a file, click Open with, and select Windows Photo Viewer to see the Windows Spotlight image listed.
Select all the items in the Assets folder and copy them all to another folder
3. Open the folder (for example, % UserProfile% \ Pictures ) where you saved the items, click the File tab , click Open Windows PowerShell, and select Open Windows PowerShell again.

4. Enter each of the commands below into PowerShell , press Enterafter each one, and close PowerShell when done. This will rename all the items in the folder and add a .jpg file extension.
cmd
ren * * .jpg

5. Add Dimensions column to the folder (eg % UserProfile% \ Pictures ) where you saved the items. Change folder view to sort by Dimensions details in descending order.\

6. You will notice that the Windows Spotlight image will be different in size for PC and mobile. You can delete the ones you don’t want to save.
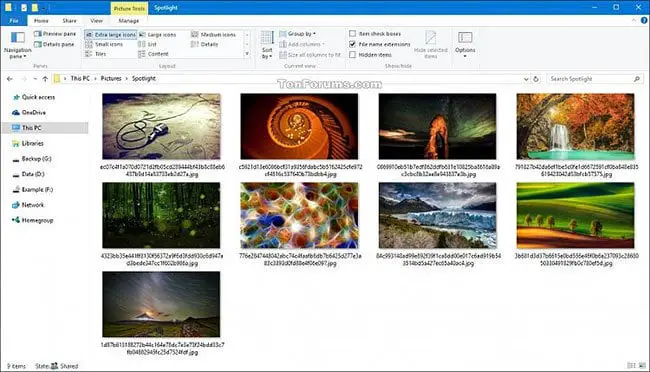
7. This is a Windows Spotlight PC 1920 x 1080 image displayed in an extremely large icon view.

Read More : How to flush DNS cache in MacOS Big Sur and Catalina??
If you do not want to use PowerShell, you can download any Rename Utility such as Bulk Renaming Utility to your computer and install it.
After installation is complete, open the application, navigate to the folder, select all files, then add the “.jpg” extension .
If you are lazy to download it manually, you can download the full set of
Good luck!


